Pong project - level
This is an article from the Pong series. Please refer to the Pong project home page if you need more context.
Level
Ball? ✅
Paddle? ✅
What’s next? Actually, having these two allows us to bring everything together into a minimal playable experience. To achieve that, a playing field - or level, in game terms - is required.
Imagine (or watch a video of) a game of Pong and think about the requirements for the playing field. For the most basic version, it could be:
Requirements
- There are two paddle instances, each controlled separately.
- The ball is spawned in the middle of the playing field.
- The ball bounces off the top and bottom edges of the screen.
- When the ball exits the field on the left or right side, a goal is scored.
- New ball is spawned after goal is scored.
I’m going to tackle this step by step. This post will be quite long, so if any topic needs a deeper dive, it will be continued in a separate post.
Let’s create Level scene and get to work.
Code examples for this post can be found on the github pong project
Paddles & controlls intro
In the previous post, which described Paddle creation, simple Paddle scene was created. You check Paddle code and scene directly here on github.
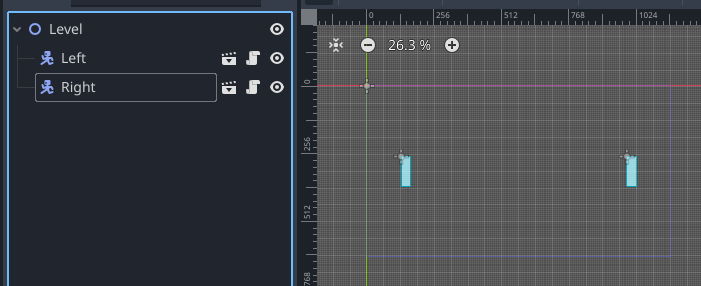
Let’s start by instantiating two Paddle instances in the level scene and placing them on opposite sides of the game window.
Simple right? But what happens when we test it? Let’s run the scene and use up and down arrows for movement.

Controlls separation
Right.. so the same set of controls moves both paddles. What’s missing is that each paddle instance needs its own set of controls.
There are multiple ways to achieve this, but for now, let’s keep it simple by:
- Add exported property
playerto the paddle script. - In
_physics_processadd conditional check checking which player is it. - Set
playerfor each instance in the editor inspector.
extends CharacterBody2D

@export var speed: float = 2048
@export var player: int = 0                     # 1

func _physics_process(delta: float) -> void:
	velocity -= velocity * delta * 5.0
	if player == 0:                             # 2
		if Input.is_action_pressed("ui_up"):
			velocity.y -= speed * delta
		if Input.is_action_pressed("ui_down"):
			velocity.y += speed * delta
	if player == 1:
		if Input.is_action_pressed("ui_home"):
			velocity.y -= speed * delta
		if Input.is_action_pressed("ui_end"):
			velocity.y += speed * delta

	move_and_slide()
For player == 0 nothing changes - it’s moved by up and down arrows. However player == 1 will only move if home and end keys are pressed.
Please note that this is a questionable choice from a code-quality perspective. The major issue is that for any additional player the conditional has to be extended, so it’s not bad for two players, but if there are more, it becomes hard to maintain.
There are also other issues: for example, it’s possible to set player == 2 and it will silently break, etc.
I will dig into this topic more as a separate post.
Now, with this code, one of the paddles needs to have the player property set to 0, while the other should have it set to 1. In my example, I’ve set the left instance to 0 and the right one to 1.

With these changes, first requirement is complete.

Spawning ball
Next step - spawn the ball. For now, let just spawn it in the middle of the playing field, without respawning and goal handing - these will be discussed later. There are few options to go with:
- Instiantiate ball scene from code at set position.
- Instiantiate ball scene at position of the Spawn node.
First, let’s look at how to reference the scene in the first place.
Referecing a scene
Again, there are multiple ways to do that — directly or via an exported variable. Most of the time I use an exported variable, as it’s only slightly more work to set up but very flexible (for example, it’s convenient to switch from AreaBall to CharacterBall and see the difference without changing the code).
Direct:
extends Node2D

var ball_scene: PackedScene = preload("res://tutorial/ball/character_ball/character_ball.tscn")
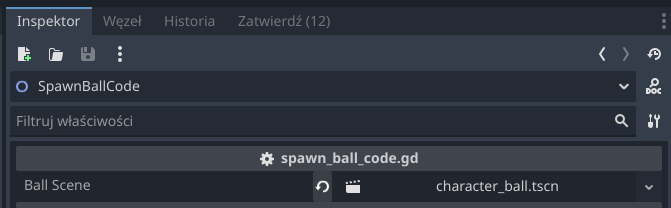
Exported variable:
extends Node2D

@export
var ball_scene: PackedScene
For exported variable next step is to set appropriate scene in the inspector.
Spawn at calculated position
To instantiate a scene at a set or calculated position, a reference to the scene is required first (see above). Then the scene needs to be instantiated and its position set to the desired one.
func _ready() -> void:
	var ball_instance = ball_scene.instantiate()
	add_child(ball_instance)                     # adds scene as a child to current Node
	ball_instance.global_position = Vector2(
		get_viewport().size.x / 2,
		get_viewport().size.y / 2
	)
It’s very simple, and this method can be used anytime there is a need to calculate or hardcode screen coordinates. Although it can cause some issues — especially when the position is hardcoded — it can be useful for its simplicity.
Spawn at the position of another node
This one is very similar to the above, except that instead of calculating the position manually, the position of another node is used.
@onready
var spawn_location: Node2D = $Spawn                   # 1

func _ready() -> void:
	var ball_instance = ball_scene.instantiate()
	add_child(ball_instance)
	ball_instance.global_position = spawn_location.global_position # 2
Ad 1: This is reference to the child node where ball will be spawned.
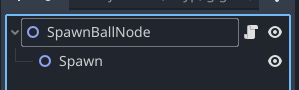
Ad 2: Sets the newly created object position to same position as spawn node. global_position can be used instead to use the position of the node to which the script is attached (SpawnBallNode from the screenshot above).
Spawn ball summary
Regardless of spawn method used, result should be something like this:
In the code examples above, the ball is spawned when the scene is loaded. This is just to keep the example simple and understandable; in the actual game implementation, it will be run when the game starts or after a goal is scored. For ball respawning logic, check this section.
Pick one method to spawn the ball and implement that in the Level scene.
Celing and floor
When the ball exits the screen on the left or right edge, a goal is scored. However, this is not true for the top and bottom of the screen — in this case, the ball should bounce off.
While it’s possible to calculate the screen edge and trigger a collision when the ball is exactly at the border, I think a much simpler option is to just place StaticBody2D nodes. This gives flexibility in adjusting their placement — something placed exactly on the screen edge may look or feel wrong, so you might need it slightly off-screen or slightly before the edge. Also, when using StaticBody2D, no additional code is needed.
Let’s add two static bodies to the Level scene and add collision shapes with rectangle shape and draw it on the top and bottom borders of the viewport.
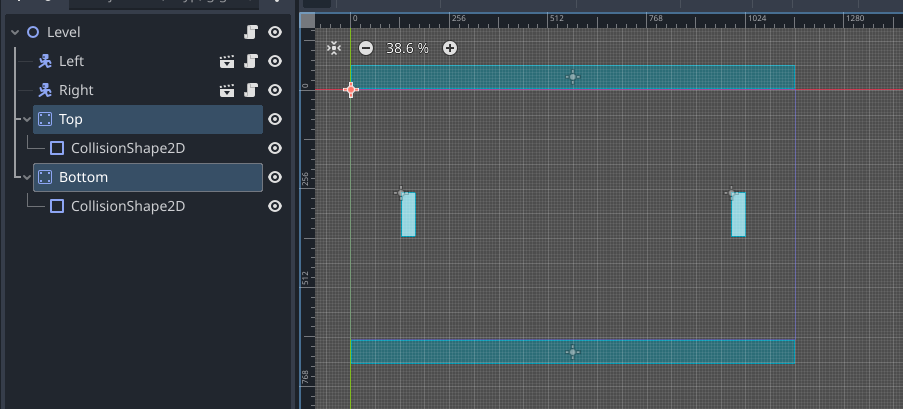
Works fine! Not much to dig into here.

Detecting goal
Area2D
To detect a goal, a similar approach as for the ceiling and floor can be used, but with a different node choice. The ball shouldn’t bounce off the left and right edges of the screen, but their crossing should be detectable so the code can reset the ball. What is the best node for that kind of behavior? I’ve chosen Area2D. From the official docs:
A region of 2D space that detects other CollisionObject2Ds entering or exiting it.
Seems like exactly right choice, let’s try it out: add two Area2D with CollisionShape2D, one on the right and one of the left side of the playing field.

Then, for each area, connect body_entered signal to the Level node script.
func _on_left_goal_body_entered(_body: Node2D) -> void:
	print_debug("Left goal")

func _on_right_goal_body_entered(_body: Node2D) -> void:
	print_debug("Right goal")
Let’s run the script and test both right and left side. For verification look into console for debug message.
Godot Engine v4.5.stable.official.876b29033 - https://godotengine.org
OpenGL API 4.1 ATI-7.0.3 - Compatibility - Using Device: ATI Technologies Inc. - AMD Radeon Pro 5300M OpenGL Engine

Left goal
   At: res://tutorial/level/level.gd:16:_on_left_goal_body_entered()
Left goal
   At: res://tutorial/level/level.gd:16:_on_left_goal_body_entered()
--- Debugging process stopped ---
Godot Engine v4.5.stable.official.876b29033 - https://godotengine.org
OpenGL API 4.1 ATI-7.0.3 - Compatibility - Using Device: ATI Technologies Inc. - AMD Radeon Pro 5300M OpenGL Engine

Right goal
   At: res://tutorial/level/level.gd:19:_on_right_goal_body_entered()
--- Debugging process stopped ---
Seems fine, right? It is, with one caveat — for the left goal test, the message is printed twice. Most of the time this won’t make a huge difference, but it may cause some bugs — for example, if the score counter is increased every time this signal fires, then one additional goal would be counted, which would be incorrect behavior.
Let’s find and fix the bug. Let’s review one more time how ball is spawned.
...
add_child(ball_instance)
ball_instance.global_position = ball_position
...
See where the problem is? The ball instance is first added as a child of the current node and then its position is adjusted to place the ball correctly. Initially, the ball instance will have the same position as the parent node (Level), and in my implementation the parent node overlaps with the left goal area.

Solution? Swap these two lines so that when the ball is added to the scene, its position is already correctly set.
Tip Always configure object before it’s rendered / added to the scene. It will help avoid bugs like objects teleportation or weird glitches.
Code detection alternative
I’m always trying to discuss alternative approaches to give some choice. In this case, it can also be done directly in code, without any additional Area nodes. For me it’s a much worse solution, but I’m presenting it for completeness — in some cases it may still be useful.
Instead of waiting for a signal, the ball’s position can be checked every frame. If the condition is met, it means the ball is outside the viewport. It works similarly, but the condition will be true on every processed frame, which means the code must be prepared to handle repeated calls unless the ball is removed immediately, etc.
Here’s the code:
var current_ball: Node2D # stored for detecting goal via manual position check

func _ready() -> void:
	var ball_instance = ball_scene.instantiate()
	...
	current_ball = ball_instance

func  _process(delta: float) -> void:
	if current_ball != null:
		# manual position checks
		var pos = current_ball.global_position
		if pos.x < 0:
			print_debug("Left goal code")
		if pos.x > 1152:
			print_debug("Right goal code")
This code is much more error prone than signal solution, especially that coordinates are hardcoded. There is an option to use Viewport to eliminate hardcoding and be prepared for different resolutions. Let’s replace hardcoding position with Viewport checks.
func  _process(_delta: float) -> void:
	if current_ball != null:
		# manual position checks
		var pos = current_ball.global_position
		if pos.x < get_viewport_rect().position.x:
			print_debug("Left goal code")
		if pos.x > get_viewport_rect().end.x:
			print_debug("Right goal code")
Much better, but I still do prefer signal approach, but it’s good to know that there is an option using Viewport to check if object is present on screen or not.
Overusing checks in _process functions can lead to performance issues.
Respawning ball
Once a goal is scored, the fight for the next point should begin. In game terms, the ball is now outside the playing field, so a new one needs to be spawned so the players can keep playing until the score limit or time limit is reached.
As expected, there are multiple ways to do this. I’ll describe two approaches. In the first one, the ball is teleported back to its initial position. The second one removes the ball from the scene and creates a new one.
Teleporting ball to the initial position
By teleporting the ball, I simply mean setting its position back to the initial one (the center of the playing field). The advantage of this approach is that no new object needs to be created, so in theory it should be more performant. Why “in theory”? In this case, the ball will only be respawned when a goal is scored, which in gameplay terms happens very rarely - once every few thousand frames, depending on the players. That means the potential performance benefit is negligible, especially since the ball is a very simple object.
As for the downsides, the ball’s internal state has to be fully reset. In this case, that means not only resetting the position but also restoring its velocity. For more complex objects, it may be easier and cleaner to simply discard the existing instance and create a new one.
Code looks as follows:
func _on_left_goal_body_entered(_body: Node2D) -> void:
	current_ball.global_position = Vector2(
		get_viewport().size.x / 2,
		get_viewport().size.y / 2
	)
	current_ball.velocity = Vector2(current_ball.SPEED, 0) # while global_position is property of every node, velocity is not, so this code is potentially bad design
This is ofcourse valid approach and can be beneficial for complex objects that are created very often.
Removing old one and creating new ball
This approach is my preferred one, and it’s simple and logical: the ball is outside the viewport, so let’s remove it and place a new ball in the center of the screen. In software engineering, premature optimization is usually avoided in favor of simplicity, readability, and maintainability. Gamedev is a little different in this regard, but I would still choose this approach unless optimization becomes necessary.
With this method, the code only needs to create a new instance and position it correctly, whereas in the previous approach the internal state of the ball has to be known and reset.
func _on_right_goal_body_entered(_body: Node2D) -> void:
	current_ball.queue_free() # schedule deletion of current ball Node
	var ball_instance = ball_scene.instantiate()
	ball_instance.global_position = Vector2(
		get_viewport().size.x / 2,
		get_viewport().size.y / 2
	)
	add_child(ball_instance)
	current_ball = ball_instance
Actually, it is very similar to the code used to place the ball initially in _ready; the only difference is the line that removes the old ball. This is a good opportunity to refactor the code and extract a method to avoid duplication.
Summary
Finally, most basic playable level is finished. In next posts I’m going to add improvements like HUD, counting scores etc. With this version you can actually play the game! It has few things to improve, also gameplay is not super fun (it requires some tweaks), but it’s playable experience.
Full code for Level scene
Complete code after some refactorings to make things cleaner. Also available on github.
extends Node2D

@export
var ball_scene: PackedScene

var current_ball: CharacterBody2D # stored for detecting goal via manual position check and to remove ball instance

func _ready() -> void:
	create_ball()

func  _process(_delta: float) -> void:
	if current_ball != null:
		# manual position checks
		var pos = current_ball.global_position
		if pos.x < get_viewport_rect().position.x:
			print_debug("Left goal code")
		if pos.x > get_viewport_rect().end.x:
			print_debug("Right goal code")

# signal goal checks - recommended approach
func _on_left_goal_body_entered(_body: Node2D) -> void:
	print_debug("Left goal")
	# respawning ball by teleporting existing instance to the initial position
	current_ball.global_position = get_ball_initial_position()
	current_ball.velocity = Vector2(current_ball.SPEED, 0)

func _on_right_goal_body_entered(_body: Node2D) -> void:
	print_debug("Right goal")
	# respawning ball by removing old one and creating new ball
	current_ball.queue_free() # schedule deletion of current ball Node
	call_deferred("create_ball")

func create_ball() -> void:
	var ball_instance = ball_scene.instantiate()
	ball_instance.global_position = get_ball_initial_position()
	add_child(ball_instance)
	current_ball = ball_instance

func get_ball_initial_position() -> Vector2:
	return Vector2(
		get_viewport().size.x / 2,
		get_viewport().size.y / 2
	)